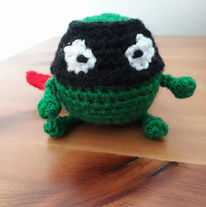
amigurumi evil pea

I posted recently about the Evil Pea I made for my son, whose class has been reading the fantastic Supertato books as part of their Superheroes theme for the term. If you would like to know how to make your very own Evil Pea, then look no further!
Yarn
You will need four colours for your Evil Pea – green, red, black and white. I used Stylecraft Special DK yarn which has a great range of shades. I used kelly green for his body, arms and legs, matador for his cape, black for his mask, and white and black again for his eyes.
Hook Size
I used a 3.25 mm hook for the body, arms and legs, a 3.75 mm hook for slip stitches on edge of the mask. The larger hook helps to differentiate the mask from the rest of the body. If you don’t have quarter size hooks, you can use a 3.5 mm hook for the body, and a 4 mm for the slip stitches.
I used a 4 mm hook for the cape. The bigger hook gives it a bit of flexibility without being flimsy.
Stitches
The pattern is written in US terms. The abbreviations are as follows:
CH – chain;
SL ST – slip stitch;
SC - single crochet;
INC - 2 SC in the same stitch;
DEC - SC decrease. I use the invisible SC decrease (insert hook into front loop only of next two stitches, draw up a loop through both stitches (two loops on hook), draw a loop through both loops on hook).


Notes and Techniques
Evil Pea's body, with mask and eyes, is made as one piece, and stuffed with toy filling. The arms, legs and cape are made separately and sewn on. Make sure you attach all parts firmly and securely so that your Pea will withstand the attentions of any small children that may want to play with it.
The body, arms and legs are worked in continuous rounds, except where the pattern specifically states to join the end of a round.
The pattern includes starting with a magic circle, finishing with an invisible join (on the body), and crocheting into the ‘bump’ of the chain (on the cape). If you haven't used these before, have a look at the how to guides here.
There are two different types of colour change for the body. When changing from green to black, and then from black back to green, I finished off the row and cut the yarn, before starting the next row with the new colour.
The other colour changes are from black to white to make the eyes. These are your typical colour changes: don't finish the previous stitch, leave the last two loops of the stitch on the hook, drop the working yarn, wrap the new colour around the hook and pull through a loop to finish the stitch. Then the next stitch is crocheted in the new colour. I used two separate short bits of white yarn, one for each eye, rather than carrying one white thread back and forth between the two eyes.
To add more definition to the eyes, I sewed around the edges of the white area using the white yarn tail, and also sewed over a couple of noticeable bits of black yarn in the eyes. I did the same with the black yarn: I wove the yarn tail across to the eye area, and sewed around the edges of the black.


Use the black yarn tail to add the pupils to the eyes. Sew two or three times per pupil to get a good solid shape. I then wove the black yarn tail back to the start, and tied it to the other end with a triple knot before trimming. I also tied off each white yarn tail to the other end of the thread to secure and trim in the same way.


The arms and legs are fiddly, especially after the decreases in round 4. To help with this, I used a paperclip (my preferred choice of stitch marker!) to keep hold of the tops while I crocheted around. This photo shows what this looked like as I crocheted round 4, putting a marker in each DEC as I went.


Body
Use green yarn, and start with the 3.25 mm hook.
Start with a magic circle.
Row 1: 6 SC into magic circle (6)
Row 2: INC around (12)
Row 3: [SC, INC] around (18)
Row 4: [2 SC, INC] around (24)
SL ST into next two stitches, cut yarn and finish the green yarn with an invisible join.
With black yarn, using the 3.75 mm hook:
Row 5: SL ST around, (24)
Join with a SL ST and CH 1
With the 3.25 mm hook, work the next row into the last row of green SC, NOT the black SL ST:
Row 6: [3SC, INC] around (30)
Row 7: 10 SC, DEC, (switch to white yarn) INC, (black) 5 SC, (white) INC, (black) DEC, 9 SC (30)
Row 8: 9 SC, DEC, (switch to white) 2 SC, INC, (black) 3 SC, (white) INC, 2 SC, (black) DEC, 8 SC (30)
Row 9: SC, [INC, 2 SC] three times, SC, (white) 3 SC, (black) 4 SC, (white) 3 SC, (black) [2 SC, INC] three times (36)
Row 10: SC around (36)
With the 3.75 mm hook:
Row 11: SL ST around (36)
To finish the black, SL ST into the next stitch (which was the first SL ST of row 11), cut yarn, leaving a long tail, and work an invisible join to finish off.
Use the yarn tails from the black and white yarn to neaten the eyes, and add the pupils.


Here is a pattern chart for the eyes, with the white stitches shown in yellow, showing where the white stitches go to create the shape of the eyes.

- row 9
- row 8
- row 7
Switch back to the green yarn, and the 3.25 mm hook:
Work row 12 into the last row of black SC, NOT the SL ST:
Row 12: SC around (36)
SL ST into first SC of row 12 (row 13 will start in the second SC of row 12, the last SC of row 13 is worked into the SL ST)
Rows 13 and 14: SC around (2 rows of 36)
Row 15: [4 SC, DEC] around (30)
Rows 16 and 17: SC around (2 rows of 30)
Row 18: [3 SC, DEC] around (24)
Row 19: [2 SC, DEC] around (18)
Begin stuffing
Row 20: [SC, DEC] around (12)
Finish stuffing
Row 21: DEC around (6)
Finish off.


Arms
Use green yarn, and a 3.25 mm hook. Make two.
Start with a magic circle.
Row 1: 4 SC into magic circle (4)
Row 2: INC around (8)
Row 3: [DEC, SC, SC] twice (6)
Row 4: DEC around (3)
Rows 5 and 6: SC around (2 rows of 3)
Finish off leaving a tail to attach to the body.
Legs
The legs are exactly the same as the arms, with one extra row of SC.
Use green yarn, and a 3.25 mm hook. Make two.
Start with a magic circle.
Row 1: 4 SC into magic circle (4)
Row 2: INC around (8)
Row 3: [DEC, SC, SC] twice (6)
Row 4: DEC around (3)
Rows 5-7: SC around (3 rows of 3)
Finish off leaving a tail to attach to the body.

Cape
Make this in red yarn, with a 4mm hook. Leave a long yarn tail when making your slip knot, as you start at the top of the cape and so can use this to sew the cape to the body.
CH 11, turn
Row 1: SC into the ‘bump’ of the second chain from the hook, and each bump across, ch 1 turn (10 SC)
Row 2: INC into first SC, SC across, ch 1 turn (11 SC)
Row 3: INC into first SC, SC across, ch 1 turn (12 SC)
Row 4: INC into first SC, SC across, ch 1 turn (13 SC)
Row 5: INC into first SC, SC across, ch 1 turn (14 SC)
Row 6: INC into first SC, SC across, ch 1 turn (15 SC)
Row 7: INC into first SC, SC across, ch 1 turn (16 SC)
Row 8: INC into first SC, SC across (17 SC)
Finish off.

Assembly
I attached the arms, legs and cape after finishing the body. The cape is attached to row 12, the first row of green SC after the mask. I take the thread around the post of the green SC, through both loops of the stitch on the cape, and back into the same space on the body.
The leg are attached to row 21, and the arms to row 13. I sew through each of the stitches at the top of the arms and the legs to attach them to the body firmly.


There you have it, your own Evil Pea. And remember, if he starts to misbehave, just pop him in the freezer. Happy making!

I'd love to see any little Evil Peas you make. Tag me on Instagram @fat_cat_crochet or try the pin on Pinterest.
You are welcome to sell any Evil Peas you make from this pattern but please credit me as the designer, and link back here if selling online. Please do not copy or sell the pattern itself.


